If you want better performance, stronger SEO, and a smoother user experience, learning how to optimize website images properly is a must.
Optimizing your images is one of the most overlooked SEO tasks, yet it plays a huge role in how fast your site loads, how search engines understand your content, and how well your pages rank.
Why You Need To Optimize Website Images
Images make your website look great, but unoptimized images can seriously hurt your rankings.
Large image files slow down your pages, increase bounce rates, and negatively affect Core Web Vitals… all things search engines care about.
When you optimize website images correctly, you benefit from:
- Faster page load times
- Better mobile performance
- Improved user experience
- Stronger on-page SEO
- Increased chances of appearing in image search results
Simply put, optimized images help both users and search engines.
How To Optimize Website Images Correctly
You can optimize your website images inside your website editor. No fancy tools or technical skills. Just follow these simple steps.
1. Resize Images Before Uploading
Never upload massive images and rely on WordPress to resize them.
- Blog images: 800–1200px wide
- Featured images: 1200–1600px wide
- Thumbnails: as small as possible
Smaller dimensions = faster loading pages.
2. Compress Image File Sizes
Image compression reduces file size without noticeable quality loss.
Aim for:
- Under 200KB for most images
- Under 100KB when possible
Pro Tip: You can compress images using free tools like TinyPNG or ImageOptim before uploading.
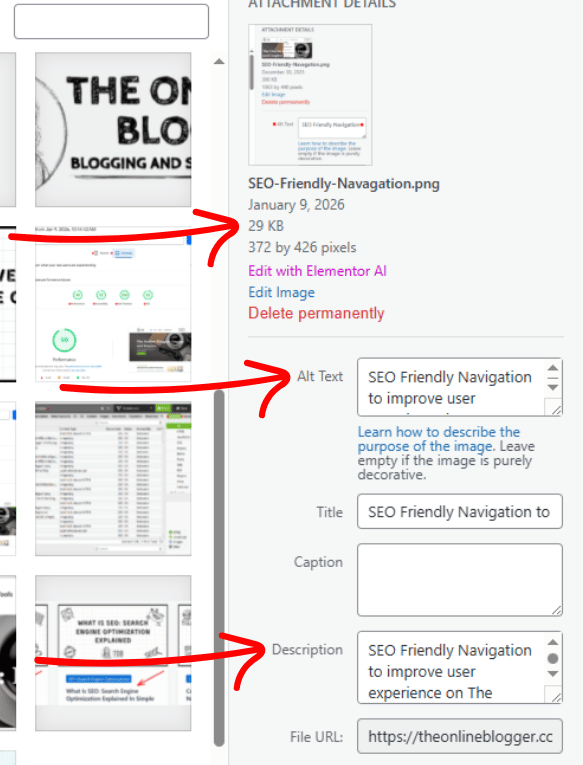
3. Use Descriptive File Names
Your image file name tells search engines what the image is about.
If a searcher is looking for an image, and your alt text matches the user search, you increase the chance of getting more clicks to your website.
❌ Bad example of image name:
IMG_48392.jpg
✅ Good example of image name:
optimize-website-images-for-seo.jpg
This small step helps reinforce your focus keyword.
4. Add SEO-Friendly Alt Text
Alt text is essential for accessibility and SEO.
Good alt text:
- Describes the image clearly
- Includes your keyword naturally
- Sounds human, not stuffed
Example image alt text:
“This is an example showing how to optimize website images for faster load speed”
5. Choose the Right Image Format
Using the correct format can significantly reduce file size.
- JPEG – best for photos
- PNG – best for logos and graphics with transparency
- WebP – modern format with smaller file sizes (recommended if supported)
Did You Know: WebP images can reduce size by up to 30% compared to JPEGs.
Common Image Optimization Mistakes To Avoid
Avoid thesemistakes, and you’ll already be ahead of most websites.
- Uploading images straight from a camera or phone
- Ignoring alt text completely
- Using oversized images everywhere
- Forgetting to compress images
- Using generic file names
Each mistake adds unnecessary weight to your site, and the more we can minimize, the better.
My Final Thoughts On Optimizing Website Images
Learning how to optimize website images is one of the easiest SEO improvements you can make… and one of the fastest to see results.
It takes just a few extra minutes per image, but the payoff is faster pages, happier visitors, and stronger rankings over time.
If you’re serious about SEO, image optimization should be part of your workflow… every single time.